Battery switch on travel trailer function is crucial for managing your RV’s power. Understanding how to use and maintain your battery switch is key to preventing dead batteries and ensuring your appliances work reliably. This guide covers everything from the basics of different switch types and wiring to troubleshooting common problems and essential safety practices. We’ll also explore power management strategies to extend your battery life and keep you powered up on the road.
This detailed explanation will help you confidently operate and maintain your travel trailer’s battery system, ensuring smooth and safe travels. We’ll walk you through various scenarios, from simple operation to more complex troubleshooting, so you can confidently handle any power-related issues that might arise.
Understanding Battery Switch Functionality in Travel Trailers
Properly managing your travel trailer’s power is crucial for a smooth and enjoyable camping experience. A battery switch is a key component in this process, allowing you to control the flow of power from your batteries to your trailer’s electrical system. Understanding its functionality is essential for safe and efficient use.
Types of Battery Switches
Travel trailers utilize several types of battery switches, each with its own advantages and disadvantages. Common types include simple on/off switches, dual-battery switches, and more sophisticated electronic switches. Simple on/off switches offer basic control, while dual-battery switches allow for the selection of either the house battery, the starting battery, or both. Electronic switches often provide additional features like monitoring battery voltage and preventing over-discharge.
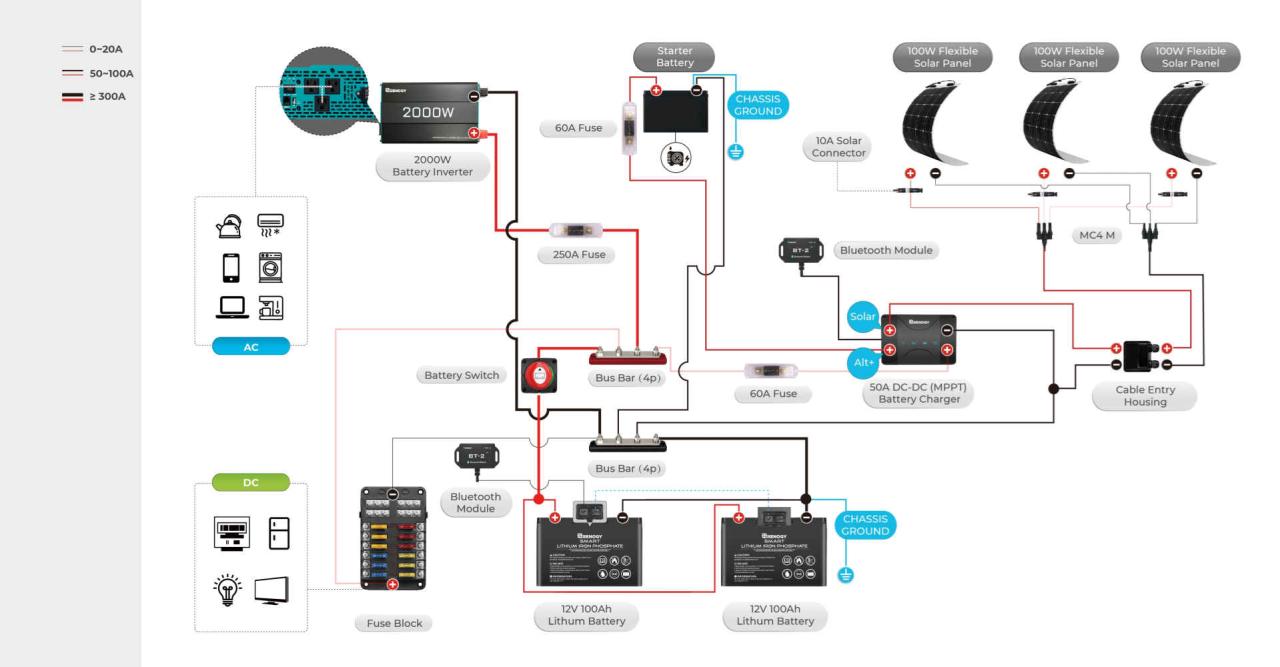
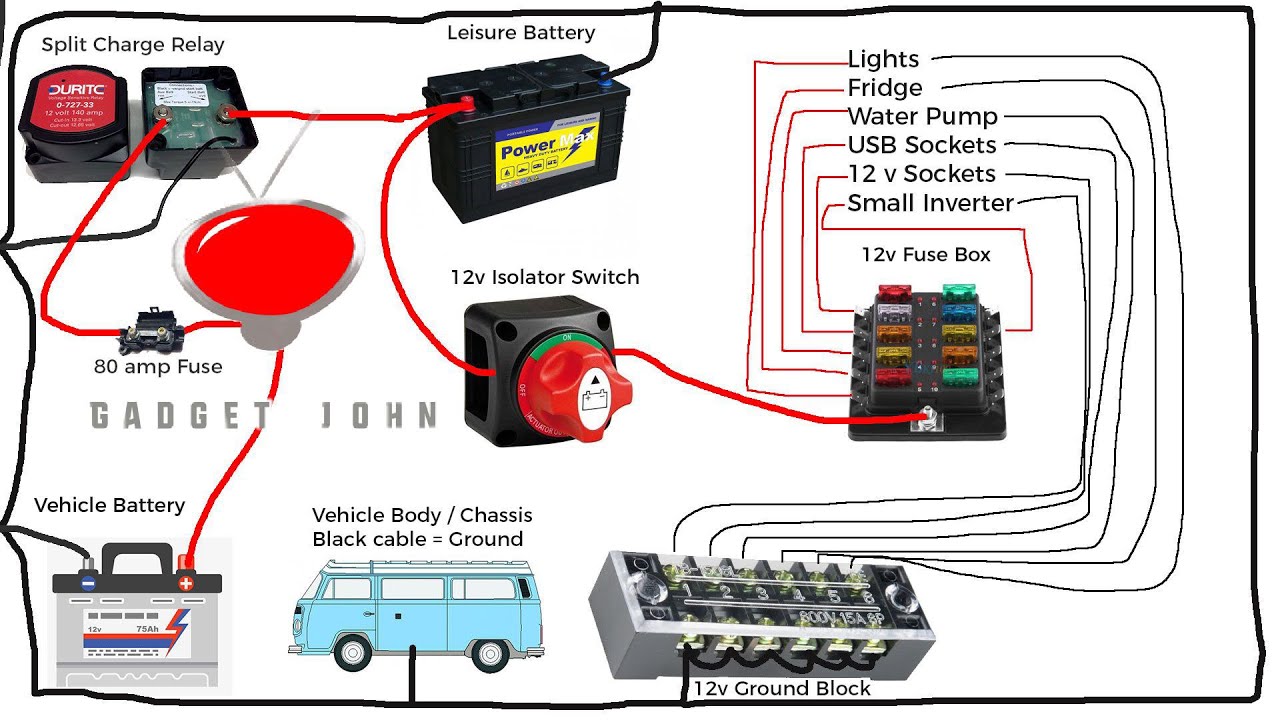
Typical Wiring Diagram of a Battery Switch System
A typical wiring diagram for a dual-battery switch system shows the house battery and starting battery connected to the switch. The switch then routes power to the trailer’s 12-volt system. A common configuration would include fuses or circuit breakers protecting the individual battery circuits and the main power feed to the trailer. The starting battery is usually directly connected to the trailer’s starting system, separate from the house battery circuit controlled by the switch.
This prevents accidentally draining the starting battery when running appliances. A diagram would visually represent these connections and components, showing the flow of electricity from batteries, through the switch, and to the various loads in the trailer.
Operating a Battery Switch
Operating a battery switch is generally straightforward. For a simple on/off switch, simply turn the switch to the “on” position to connect the battery to the trailer’s electrical system. For a dual-battery switch, there will be multiple positions, such as “house,” “both,” “start,” and “off.” Select the desired position according to your needs. Always consult your specific switch’s instructions for the correct operation.
Before operating any switch, ensure that you understand the labels and positions to avoid accidental disconnections or short circuits.
Comparison of Battery Switch Types
| Battery Switch Type | Advantages | Disadvantages | Cost |
|---|---|---|---|
| Simple On/Off Switch | Simple, inexpensive, easy to install | Limited functionality, only controls one battery | Low |
| Dual Battery Switch | Controls two batteries independently, prevents draining starting battery | Slightly more complex than a simple switch | Medium |
| Electronic Battery Switch | Advanced features like battery monitoring, automatic switching, and low-voltage protection | More expensive, potentially more complex installation | High |
Troubleshooting Common Battery Switch Issues
Your travel trailer’s battery switch is a crucial component, and problems with it can leave you stranded without power. Understanding common issues and how to troubleshoot them is essential for maintaining your RV’s functionality. This section will guide you through identifying and resolving problems with your battery switch.
Faulty battery switches manifest in several ways, often leaving you with no power to your appliances or a completely dead battery. These problems usually stem from a few key sources: worn-out components, loose connections, or even a simple switch failure. Let’s explore the most common symptoms and their causes.
Common Battery Switch Problems and Their Symptoms
A malfunctioning battery switch can present several distinct symptoms. For instance, you might find that your appliances have no power even though your batteries appear charged. Conversely, you could experience a rapidly draining battery even with minimal appliance usage. Sometimes, the switch itself may feel loose or difficult to operate. These issues often point towards internal switch problems, corrosion on the terminals, or loose wiring.
So, you’re an audiophile who loves to travel? Awesome! Check out this guide on building the perfect audiophile travel setup for those epic outdoor adventures. It’s all about finding that sweet spot between portability and sound quality. But if you’re more of a solo traveler, focusing on lightweight gear, then you’ll want to browse the tips and tricks for a killer audiophile travel setup designed for the independent explorer.
Both guides offer solid advice on packing your favorite tunes without sacrificing quality sound on the go.
A completely dead battery, even after charging, could indicate a problem with the switch’s ability to properly connect to the battery.
Troubleshooting Steps for No Power to Appliances, Battery switch on travel trailer function
If your appliances aren’t receiving power, systematically check the following:
First, verify that the battery switch is indeed in the correct position. A simple mistake can be the root cause. Next, inspect the switch itself for any signs of damage or corrosion. Look for loose wires or connections. Clean any corroded terminals with a wire brush and baking soda solution.
If the problem persists, check the fuses and circuit breakers both in your RV and near the battery. If all fuses and breakers are fine, a multimeter can help you check for voltage at the battery and at the appliance power inputs to pinpoint the location of the power failure. Finally, if you’re still experiencing issues, it may be time to replace the battery switch.
Troubleshooting Steps for a Dead Battery
A dead battery despite charging suggests a parasitic drain or a problem with the switch’s connection.
Begin by ensuring the battery switch is correctly turned off when not in use to prevent draining. Check for any parasitic draws by disconnecting the negative battery terminal and using a multimeter to measure the current draw. Any significant current draw (more than a few milliamps) indicates a component drawing power even when the RV is off. Isolate this component and address the issue.
So, you’re an audiophile who loves to travel? Awesome! Planning your next trip? Check out this guide on audiophile travel aetup for tips on packing your precious gear. It’s all about finding that sweet spot between portability and sound quality. Then, for those solo adventurers, audiophile travel aetup offers advice specifically tailored to the single traveler, focusing on lightweight options and easy-to-manage setups.
Remember, good sound shouldn’t be sacrificed just because you’re on the go!
If no parasitic draw is found, inspect the battery switch connections for corrosion or loose wires. Clean the terminals and ensure tight connections. If the problem continues, consider testing the battery itself with a battery load tester to rule out battery failure. If the battery is healthy and the switch connections are secure, replacing the battery switch is likely the next step.
Troubleshooting Flowchart
The following flowchart visualizes the troubleshooting process for a non-functional battery switch:
Start → Check Battery Switch Position (Correct? Yes/No) → No: Correct Switch Position → Check for Power to Appliances (Power? Yes/No) → No: No Power → Inspect Switch for Damage/Corrosion (Damage? Yes/No) → Yes: Clean Terminals/Tighten Connections → Check Fuses/Circuit Breakers (Problem Solved? Yes/No) → No: Replace Battery Switch → Yes: Problem Solved → End
No: Incorrect Switch Position → Correct Switch Position → Check for Power to Appliances (Power? Yes/No) → Yes: Problem Solved → End
Yes: Power to Appliances → Check for Parasitic Drain (Parasitic Drain? Yes/No) → Yes: Isolate and Repair → Check Battery Switch Connections (Problem Solved? Yes/No) → No: Replace Battery Switch → Yes: Problem Solved → End
No: No Parasitic Drain → Test Battery (Battery Healthy? Yes/No) → No: Replace Battery → Yes: Replace Battery Switch → End
Battery Switch and Power Management
Your travel trailer’s battery switch is the central nervous system of your power system, controlling the flow of electricity between your batteries and your appliances. Understanding how it works is crucial for preventing costly mistakes and ensuring a smooth camping experience. Proper management prevents premature battery failure and keeps your lights and appliances running smoothly.The battery switch acts as a gatekeeper, allowing you to selectively power your trailer from either your house batteries, your tow vehicle, or both simultaneously.
In the “off” position, it completely disconnects the batteries, preventing any drain, even from small parasitic loads that constantly draw power (like the RV’s clock). The “both” position connects both your house batteries and the charging source (your tow vehicle’s alternator or shore power) to power your trailer. This is ideal for charging your batteries while driving or when plugged into shore power.
The “battery” position powers your trailer solely from your house batteries, which is useful for off-grid camping.
Power Consumption of Different Appliances
Different appliances in your travel trailer consume varying amounts of power. Knowing this helps you make informed decisions about energy usage. For example, a small LED light uses far less power than a large air conditioner. A refrigerator, even a small one, draws significantly more power than a fan. Running multiple high-power appliances simultaneously can quickly drain your batteries.
Consider the following power consumption ranges (these are estimates and will vary depending on the specific model):
- LED lights: 1-5 watts
- Incandescent lights: 25-100 watts
- Fans: 10-50 watts
- Refrigerator (12V): 30-100 watts
- Air conditioner: 1000+ watts
- Microwave: 1000+ watts
It’s important to note that these figures are typical power
- draw*. The actual power
- consumption* depends on usage time. A 10-watt fan running for 10 hours consumes 100 watt-hours (10 watts x 10 hours).
Best Practices for Maximizing Battery Life and Efficient Power Usage
To extend the lifespan of your batteries and avoid unexpected power outages, follow these best practices:
- Always turn off the battery switch when not using the RV: This prevents parasitic drain from small electronics.
- Use energy-efficient appliances: LED lights, for example, consume significantly less power than incandescent bulbs. Consider the power consumption of any appliance before using it.
- Minimize the use of high-power appliances: Avoid running your air conditioner and microwave simultaneously.
- Charge your batteries regularly: When connected to shore power, ensure your batteries are fully charged. Driving with your tow vehicle will also charge the batteries via the alternator.
- Monitor your battery voltage: Regularly check your battery voltage using a multimeter to ensure they are adequately charged. Low voltage can damage your batteries. A fully charged 12V battery will typically show around 13.2V.
- Consider solar panels: Supplement your house batteries with solar panels for extended off-grid camping.
- Regularly inspect and maintain your batteries: Keep your batteries clean, terminals free of corrosion, and check the electrolyte level (if applicable) as recommended by the manufacturer.
Proper battery maintenance and mindful energy consumption are key to enjoying a reliable power supply in your travel trailer.
Safety Considerations and Maintenance: Battery Switch On Travel Trailer Function
Working with a travel trailer’s battery system requires caution due to the potential for electrical shock and fire hazards. Proper safety procedures and regular maintenance are crucial for ensuring safe and reliable operation. Ignoring these precautions can lead to serious injury or damage to your trailer.Proper handling of batteries and the battery switch is essential to prevent accidents.
Understanding the system’s components and their functions is the first step towards safe operation. This includes knowing where the battery switch is located, how it operates, and its role in managing power flow to your trailer’s electrical system.
Safe Disconnection and Reconnection of the Battery Switch
Always disconnect the negative (-) battery terminal first when working on the battery system. This minimizes the risk of accidental short circuits. When reconnecting, attach the negative (-) terminal last. Use insulated tools to avoid accidental contact with metal parts and to prevent electrical shock. Before disconnecting the switch, ensure all appliances are turned off to avoid power surges or damage.
Visually inspect the connections for corrosion or damage before reconnecting. Tighten all connections securely.
Battery Switch and Related Component Maintenance Schedule
Regular inspection and maintenance are key to preventing problems. A simple visual inspection of the battery switch and its connections should be part of your pre-trip checklist. Look for signs of corrosion, loose connections, or damage to the wiring. Clean any corrosion with a wire brush and baking soda solution, then apply a corrosion inhibitor. At least once a year, or more frequently in harsh environments, thoroughly inspect all wiring, connections, and the battery switch itself for any signs of wear or damage.
Replace any damaged parts immediately. Consider using dielectric grease on connections to prevent corrosion.
Safety Tips to Prevent Electrical Hazards
Before working on the battery system, always wear appropriate safety glasses and gloves. This will protect your eyes from sparks and your hands from potential injury.
- Never work on the battery system in wet or damp conditions. Water can conduct electricity and increase the risk of shock.
- Ensure proper ventilation when working near batteries, as they can release flammable gases.
- Keep children and pets away from the battery system at all times.
- Use only insulated tools when working with the battery system. Avoid using metal tools.
- Always disconnect the negative (-) terminal first when disconnecting the battery and reconnect it last when reconnecting.
- Never touch the terminals of the battery simultaneously; this can cause a short circuit and severe burns.
- If you are unsure about any aspect of working with your travel trailer’s battery system, consult a qualified electrician or RV technician.
Battery Switch Installation and Upgrades
Installing or upgrading your travel trailer’s battery switch can significantly improve your power management and overall camping experience. This process requires some basic electrical knowledge and careful attention to safety procedures. Improper installation can lead to electrical hazards, so consult a professional if you’re unsure about any aspect of the work.This section details the installation of a new battery switch, upgrading to a more sophisticated system, and ensuring compatibility with your existing setup.
We’ll also cover proper wiring techniques for a safe and efficient connection.
Installing a New Battery Switch
Replacing a faulty or outdated battery switch involves disconnecting the battery, carefully removing the old switch, and installing the new one in its place. Begin by disconnecting both positive (+) and negative (-) battery cables from the battery terminals. This is crucial for safety. Then, remove the old switch, taking note of how the wires are connected. This will serve as your guide for the new installation.
The new switch should be mounted securely in a location that’s easily accessible and protected from the elements. Wire the new switch according to the manufacturer’s instructions, ensuring a tight connection to prevent corrosion and power loss. Reconnect the battery cables after the installation is complete, double-checking all connections before turning on any appliances.
Upgrading to a More Advanced Battery Switch System
Many modern travel trailers utilize more complex battery management systems. Upgrading from a simple on/off switch to a system with features like a battery isolator, charge controller, and a more robust switch can significantly improve battery life and power distribution. A battery isolator prevents the house batteries from draining the vehicle’s starting battery, while a charge controller optimizes charging from solar panels or alternators.
These upgrades typically require more extensive wiring and may necessitate professional installation, especially if integrating solar panels or other power sources. Consider the capacity of your new switch and its compatibility with your battery bank size and appliance demands. An incorrectly sized switch can overheat or fail prematurely.
Battery Switch Compatibility and Wiring Techniques
Choosing the right battery switch depends on several factors including the type of batteries used (flooded lead-acid, AGM, lithium), the number of batteries, and the total amperage draw of your appliances. Different switches have different amperage ratings, and selecting a switch with insufficient amperage can lead to overheating and failure. Always ensure the switch’s amperage rating exceeds the total amperage draw of all connected appliances.
For example, a system with a 100-amp draw should use a switch rated at least 150 amps for a safety margin.Proper wiring involves using appropriately sized wires and connectors. Use heavy-gauge wire for high-amperage circuits and ensure all connections are clean and tight. Use appropriately sized fuses or circuit breakers to protect the wiring and appliances from overcurrent situations.
Crimp connectors should be used for all connections and sealed with heat-shrink tubing to prevent corrosion and ensure a secure connection. Never use undersized wire, as this creates a fire hazard. Always follow the manufacturer’s wiring diagram provided with the switch. Improper wiring can lead to short circuits, overheating, and fire hazards.
Visual Representation of Battery Switch Components
Let’s get a clearer picture of what a battery switch looks like and how it works. Understanding its physical components is key to proper use and troubleshooting. We’ll cover the typical appearance, materials, and internal mechanisms of both a standard battery switch and a battery disconnect switch.A typical battery switch for a travel trailer is usually a relatively compact device, often mounted in a readily accessible location, perhaps near the battery itself or within a dedicated electrical compartment.
It’s designed to handle significant current, so it’s built robustly.
Battery Switch Physical Appearance and Function
Most battery switches are rectangular or square-shaped boxes made of durable, non-conductive plastic or metal. They typically have several large terminals, usually made of heavy-gauge brass or copper, for connecting the positive and negative cables from both the house battery and the vehicle’s charging system. These terminals are clearly labeled (usually with “+” and “-“). The switch itself is often a large, sturdy toggle switch or a rotary dial switch, allowing you to select different power configurations.
Many switches incorporate an indicator light – usually a small LED – that shows the current power status (e.g., which battery is currently supplying power). The switch’s size can vary, depending on its current rating and the number of batteries it manages.
Typical Battery Disconnect Switch Description
A battery disconnect switch serves a crucial safety function – completely isolating the batteries from the trailer’s electrical system. These switches are typically larger and more robust than standard battery switches, often made of heavy-duty metal for enhanced durability and current handling capacity. They often feature a keyed lock or a padlock provision to prevent accidental or unauthorized operation.
Connection points are typically large, heavy-gauge terminals designed for easy and secure connection of the battery cables. Size varies, but you might expect something roughly 4-6 inches square or rectangular, depending on the amperage rating.
Internal Workings of a Battery Switch
Imagine the inside of the switch as a sophisticated, yet simple, electrical pathway. The heart of the switch is a set of heavy-duty contacts, usually spring-loaded for reliable connection. When you operate the switch (toggle or rotary), these contacts move to either connect or disconnect different circuits. For example, in a two-battery system, the switch might route power from either the house battery or the vehicle’s charging system to the trailer’s electrical system.
The internal wiring connects these contacts to the terminals on the outside of the switch. The indicator light (if present) is connected to a circuit that reflects the current switch position. The entire assembly is encased in a protective housing to prevent accidental contact and to protect the internal components from the elements.
Mastering your travel trailer’s battery switch is a simple yet powerful way to enhance your RV experience. By understanding its function, troubleshooting potential problems, and implementing proper maintenance, you’ll ensure reliable power for all your adventures. Remember safety first – always disconnect your battery before performing any maintenance. With a little knowledge and care, you can keep your travel trailer powered up and ready for anything.
FAQ Corner
What type of battery switch is best for my travel trailer?
The best type depends on your needs and setup. A simple on/off switch is sufficient for basic needs, while a dual-battery switch allows switching between batteries or combining them. Consider a battery isolator for charging multiple batteries simultaneously.
How often should I check my battery switch?
Visually inspect your battery switch monthly for corrosion, loose connections, or damage. Tighten any loose connections and clean terminals as needed.
My battery switch is making a clicking sound. What’s wrong?
A clicking sound often indicates a faulty switch or a low battery. Check your battery voltage and inspect the switch for any visible damage. If the problem persists, replace the switch.
Can I use my travel trailer appliances with the battery switch off?
No. The battery switch controls power to your appliances. Turning it off completely disconnects the batteries from the system.
